Publishing your event on Facebook can help you reach a wider audience. You can add your Billetto event to Facebook in just a few simple steps.
To publish your event on Facebook, you need to have a public Facebook Page. If you don’t have a Facebook Page yet, you can create one i in just a few minutes.
Note: You can’t use this feature to publish an event to your personal Facebook profile or to a Facebook Group.
You also can’t edit or delete existing Facebook events using this feature (this applies to events created directly on Facebook).
1. To add your event to Facebook:
-
Log in to Billetto and go to My Billetto, then find the event you want to add to Facebook.
-
Go to the Marketing menu and click Facebook Event.
-
Accept the marketing terms and connect to Facebook.
-
Click the “Connect to Facebook” button.

2. Log in to your Facebook profile. If you have already granted Billetto permission to access your Facebook account, it should connect right away

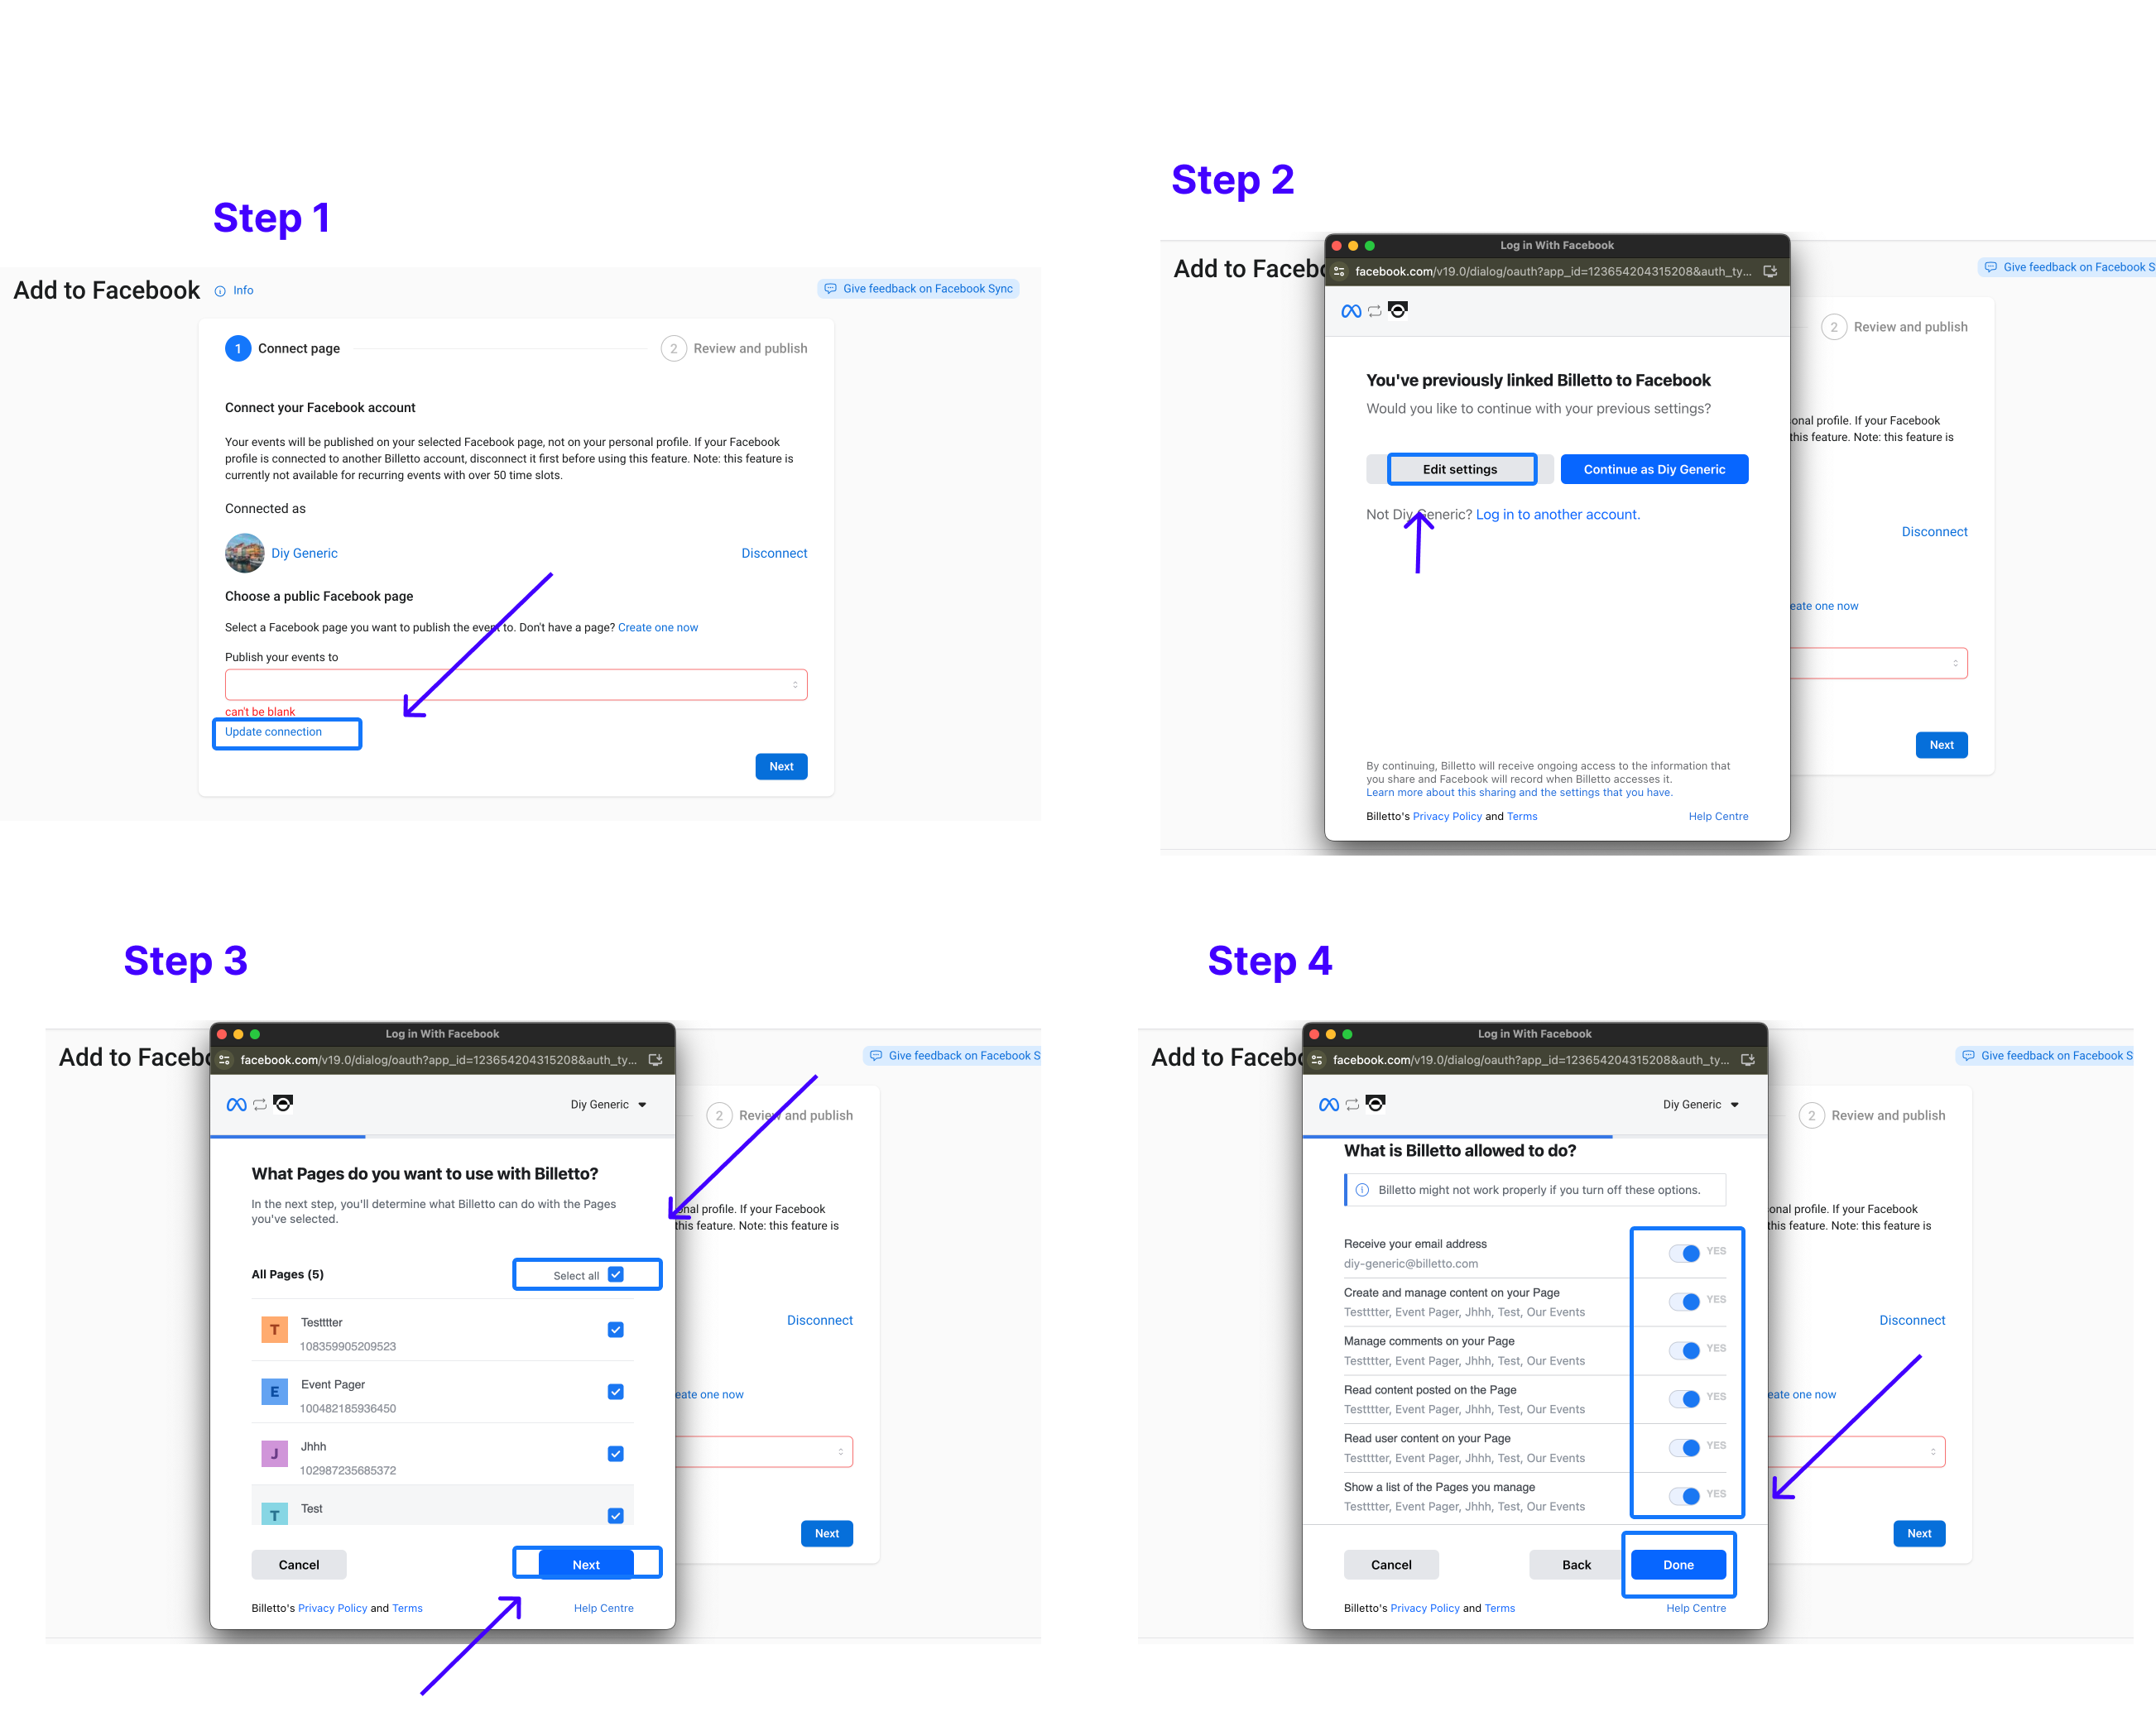
3. Once the connection to Facebook has been established, choose which Facebook Page your event should be published on.
-
Under “Choose a public Facebook Page,” choose the Facebook Page where your event should appear.
-
Your events will only be published on Facebook Pages — not on your personal profile.
-
If you don’t have a Facebook Page, you can click “Create one now” and follow Facebook’s instructions.
-
Once you’ve selected the Page, click “Next” to continue.

4. In this step, you choose when your event should be published on Facebook and how the content should be synced.
-
Under “When would you like to publish the event?”, you can choose between:
-
Publish now
The event will be created immediately as an active event on your Facebook Page and will be visible to all your followers.
-
Create draft
The event will be created as a draft on Facebook and won’t be visible to your followers until you publish it manually.
You can choose whether the event description should be automatically synced from Billetto to Facebook.
If this setting is enabled, changes made to the description in Billetto will automatically be updated on Facebook.
Disable it if you want to edit the description manually directly on Facebook.
When you’re ready, click “Publish” to complete the setup.
You can also click “Back” if you want to change your previous selections.
ℹ️ Note: In some cases, Facebook may crop the event banner from Billetto.

5. Once the setup is complete, you will receive a confirmation that your Facebook event has been created.
-
You will see the message “Your Facebook event is live!”
(or that the event has been created as a draft, if you selected this option in the previous step). -
A direct link to the Facebook event will be displayed, which you can share with your audience.
-
By default, synchronization of the event description from Billetto to Facebook is enabled.
-
This means that any changes made to the event description in Billetto will automatically be updated on Facebook.
-
You can disable this at any time if you prefer to edit the description manually on Facebook.
Options after creation:
-
Update – Refresh the connection or synchronization between Billetto and Facebook.
-
Delete Facebook event – Removes the Facebook event without deleting the event itself in Billetto.
Note: If you selected Create draft in the previous steps, you will not be able to access the Facebook event link until the event is published.

6. Your event is now live on Facebook
Once your event is published, it will automatically appear as a post on the Facebook Page you selected. You may see a post that says “[Page name] created an event.”
The event image, title, date, time, and location will be displayed directly in the feed.
Users can:
-
Click the event to view the details
-
Mark themselves as “Interested” or “Going”
-
Share the event with their network
Your event is now visible to your followers and can start generating awareness and engagement on Facebook.

Remember:
-
You can edit your Facebook event directly on Facebook if you want to make changes. This will not affect the event setup you have created on the Billetto platform.
-
If you delete your Facebook event via the Billetto platform, it will not delete the event you created on Billetto.
-
If you’re having trouble connecting to Facebook, it may be because that Facebook user is already linked to another Billetto user account. You’ll need to log out of that account before you can connect and publish via the account you’re trying to use.
-
You cannot edit or delete existing Facebook events that were created directly on Facebook through the Billetto platform.
Troubleshooting:
Can't find the public page you want to advertise to?
See steps in image below
Sync button Grey
If the Facebook Sync Button is grey then this means that Facebook isn't loaded on our website. In most cases this is due to a browser extension/plugin blocking facebook.
Error that there is already a connection or other permission issues
You may need to visit your Facebook Settings and check the permissions are setup correctly here:
https://www.facebook.com/settings?tab=business_tools&ref=settings
From here, either:
- Remove Billetto from this list and retry again to use Facebook Sync
- Click View and edit and grant Billetto access to create and manage the pages you need.
